Has your law firm has used TV commercials in the past to promote your legal services? Many law firms, especially ones that deal with Criminal and Personal Injury law, have used this to advertise to people in areas that their firms serve.
What if I told you that your firm could expand its reach to people who are browsing with their mobile phones, scrolling through their Facebook news feeds on the bus on the way to work in the mornings, sitting in a cafe or even watching live streams on their TVs at home.
Is that something you might be interested in?
If so, then this article is for you. We’re going to walk through how to transfer your firm’s TV Ad into a brand new Facebook campaign. The only thing you need to get started is a Facebook Business Page (… and a credit card, of course).
Creating a Facebook Video Ad Campaign from a Traditional TV Commercial
Before we discuss creating a Re-targeting Ad Campaign, you can read this section if you’re new to Video Ads on Facebook.
When I say traditional, I mean a regular, conventional advertisement that you would air with your local TV news station. In this section, we will discuss how to run the same type of traditional TV ad, by “airing” it on Facebook.
1 – Create a New Facebook Ad Campaign
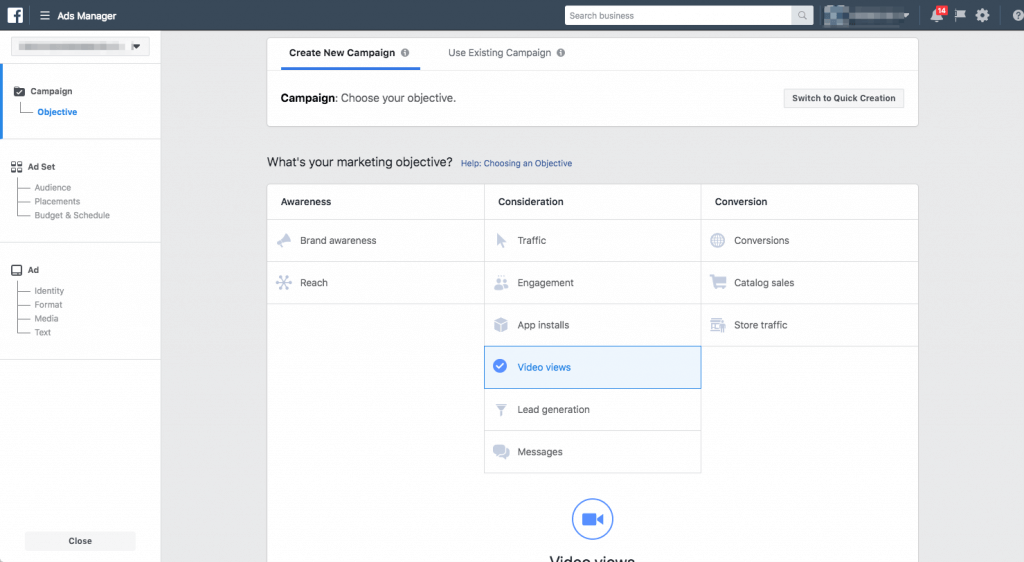
To start with your video Ad, go to Facebook Ads Manager Creation module and start off with a new campaign. You should be shown a screen like the one below. This tutorial will assume you are creating a new campaign. Within the middle column for marketing objectives, select Video Views.
Setup the Campaign Settings
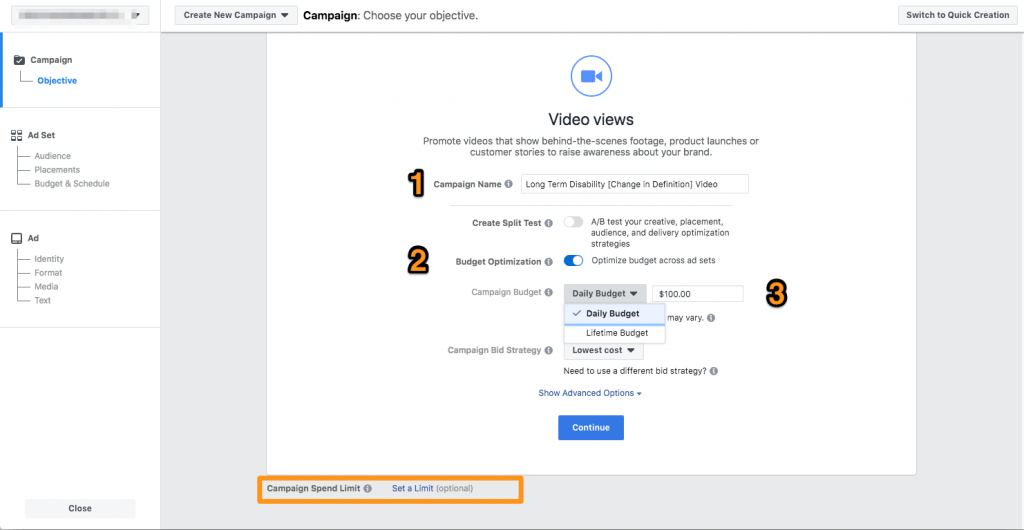
After clicking Video Views, scroll down and you should see several pieces of information we need to set up.
Fill in a Campaign Name. Because we’re promoting a commercial to advertise for LTD / Disability cases, we’ll name the campaign “Long Term Disability [Change in Definition] Video”. The TV commercial is aimed towards targeting people who are going through the Change in the Definition period.
Change your campaign name to whatever makes sense for your video ad. The public doesn’t see any of this information, it’s for you and your marketing managers’ reference later for managing and monitoring the video ad campaign on Facebook.
In this campaign, we’re going to turn on Budget Optimization. This will then bring up the Campaign Budget box where we can fill in our budget. You can choose between a daily and a lifetime budget and fill in the desired amount. For this campaign, we will choose Daily Budget and select $100.00. This means that we’re prepared to allow Facebook to spend $100.00 per day on our video ad campaign.
Somedays, Facebook’s algorithm may decide to spend more and others it may spend less, depending on how much attention or traffic it thinks it can get your ad. Don’t worry, over the long run it will average $100.00 per day.
Keep the Campaign Bid Strategy set to the Lowest cost and click Continue. We don’t need to deal with advanced settings in this video ad campaign.
2 – Creating our Ad Campaign’s Ad Set
Now that we have filled in the basic information about the Campaign, including the name and budget we’re willing to spend, next involves creating something called the Ad Set.
This is where we deal with choosing where our Audience, Placements, and Budget & Schedule. Although, we won’t have to worry about the budget in this section since we selected Budget Optimization and already set the daily budget in the previous step.
Setting up the Audience
First, fill in the Ad Set Name. We’re going to name it LTD Ad Video [NYC] since we are going to target New York City for our video ad. PS – If you’re confused about why we needed to name the campaign and the ad set, don’t worry, it is lost on many beginners. I will explain naming these at the end of the article.
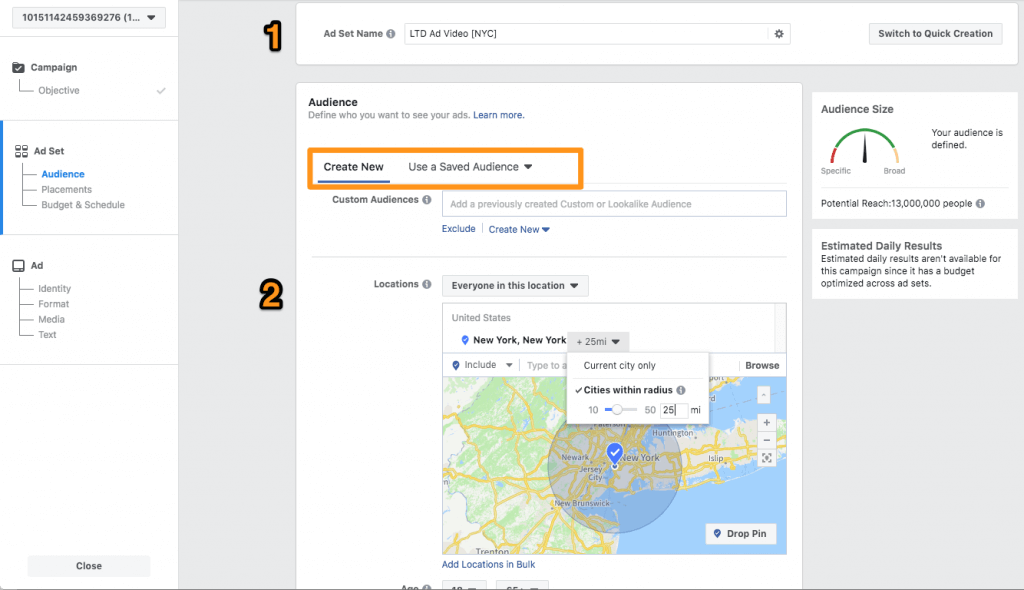
Within the Audience box, we will assume you are creating a new audience. Leave the tab set to Create New. Leave Custom Audiences and move down to Location.
Target your Potential Client’s Profile
Type in the area you want to target and wait until you see Facebook autocomplete and list areas that match your location query (New York, New York in our example). Select it from the list of options and you should see a blue pin on a map. You can click next to the name of the area you just selected and change the target radius (or select to just target the city).
Since you’re a law firm (and new to Facebook ads), you’ll likely want to change the option above the map from Everyone in the location to People who live in this location.
We also have the ability to exclude areas as well. Since we selected NYC and created a target radius around it, this is a perfect example to demonstrate exclusions. Because NYC isn’t far from New Jersey, and as a law firm, you are likely limited by states you practice in, you will want to exclude New Jersey entirely, since the radius around NYC overlaps into NJ.
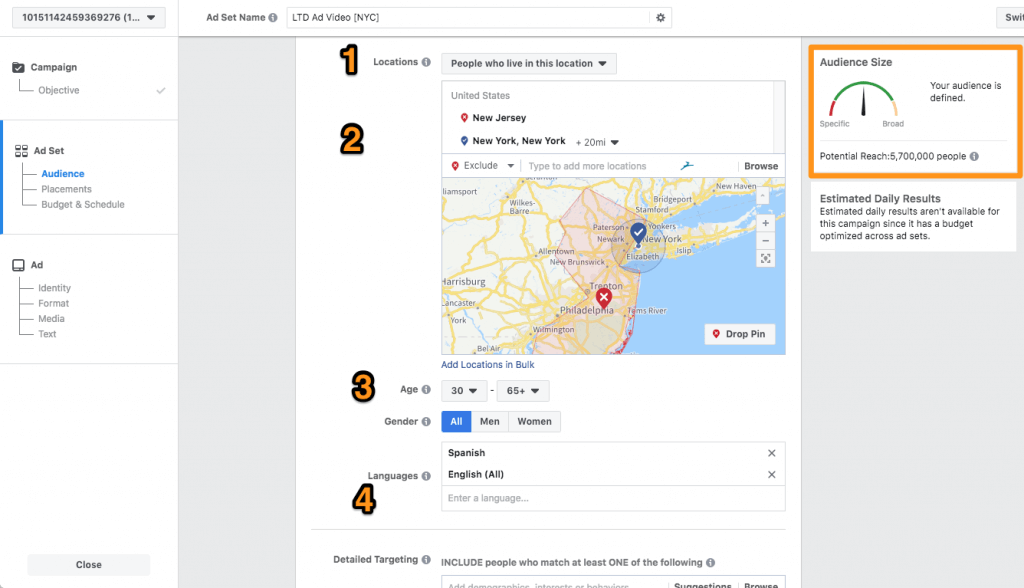
Next, you have options to target by Age, Gender, and Language. This is useful if you have a good handle on your client demographics. Since this is a Disability video ad, we will move up the age from 18 to 30. Also, our client’s firm deals with clients whose primary languages are English and Spanish.
Placements, Budget & Schedule
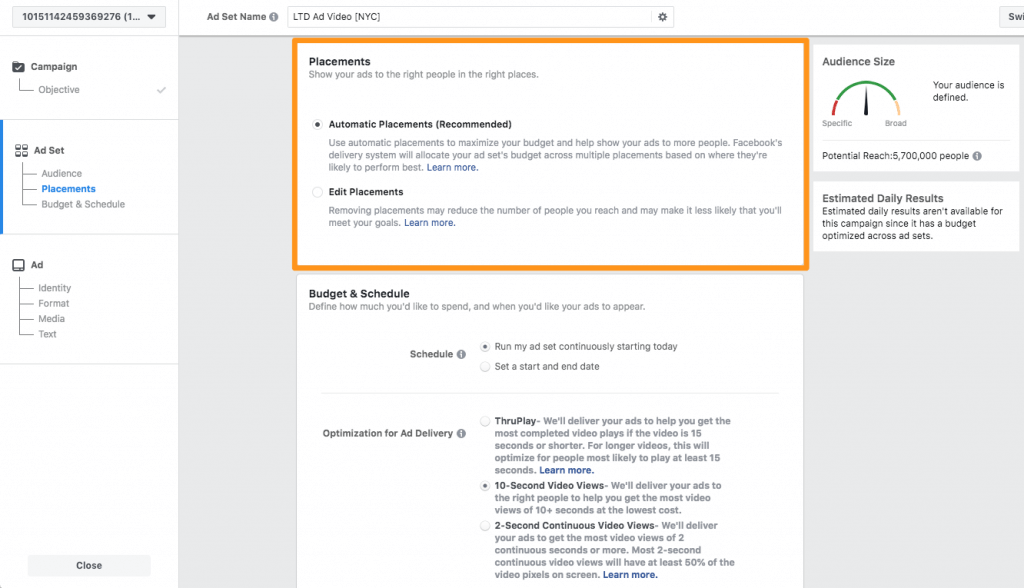
Placements give you the ability to decide where your video Ad appears on Facebook and other applications. Facebook partners with many apps and websites for greater advertising reach, including Instagram. Editing placements is definitely very useful and it’s a great tool for optimizing your campaign’s performance.
For this ad, we will leave it set to Automatic Placements since this a more advanced topic.
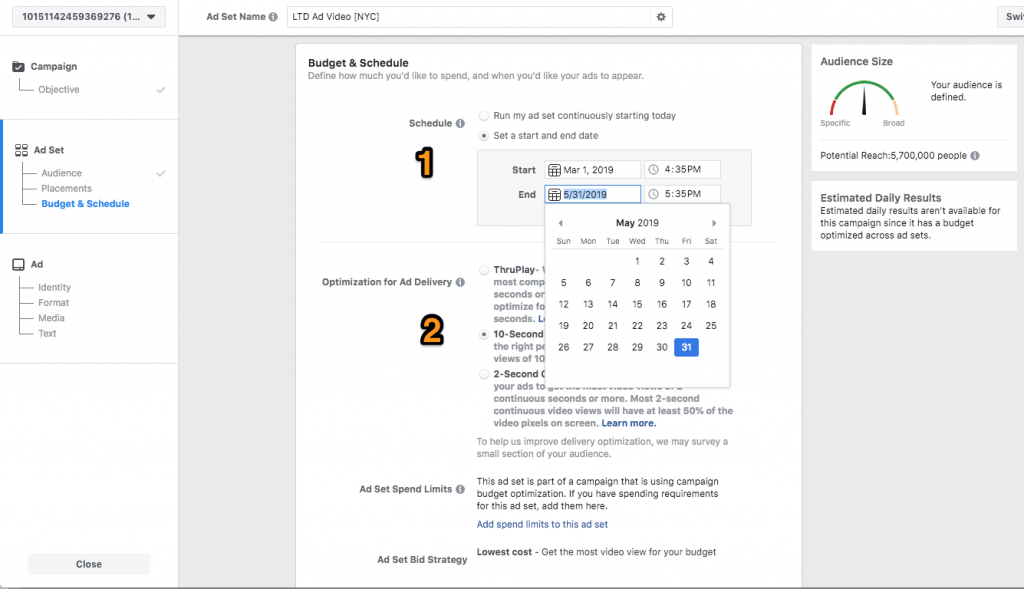
Scroll down to the Budget & Schedule section. If you’re new to Facebook ads, then without a question you should select Set a start and end date within the schedule module. Choose the dates and times you want to start and stop running your ads.
Next, within the Optimization for Ad Delivery section, I recommend you choose between ThruPlay and 10-Second Video Views options. Since most law firms run TV commercials for approximately 15 seconds, there’s a 5-second window between choosing the ThruPlay and 10-second Video Views.
ThruPlay is a newly introduced option from Facebook. It will try to find people who are most likely to watch your ad to the end. Experimenting with the Ad Delivery options is another great area for a more advanced marketing manager to test and optimize your ad performance.
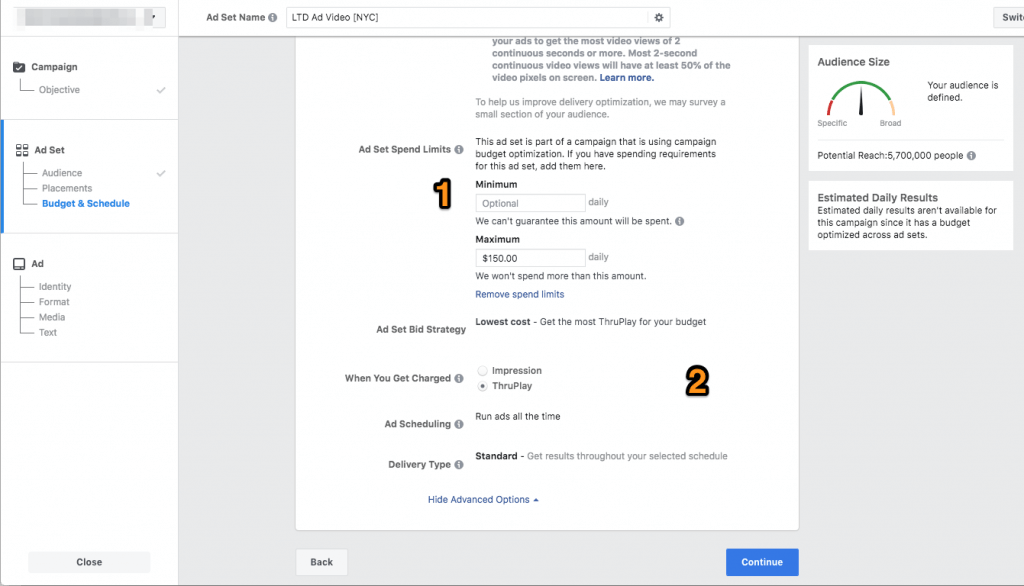
Optionally, you can click on Add spend limits to this ad set and set a daily maximum you are willing to allow Facebook to spend on your ads. If you’re new and you may want to run a shorter campaign or just experiment, it doesn’t hurt to set a maximum limit.
In this example, we selected ThruPlay, so we have the ability to choose between this and Impressions, for when you are charged. ThruPlay charges are going to be more expensive, but this is reasonable seeing that Facebook is going to charge us when people watch to the end of our ad. Once you click Continue, we have finished configuring the Ad Set settings.
3 – Creating the Video Ad (Finally)
We’re now at the home-stretch. In this section, we will upload our ad, link to our website and handle the creative (text and captions).
Create a name for the Ad. This name should describe the video. If the Video file you’re uploading already has a descriptive name, then you can use that. We’re going to name our Ad “LTD Video Change in Definition”.
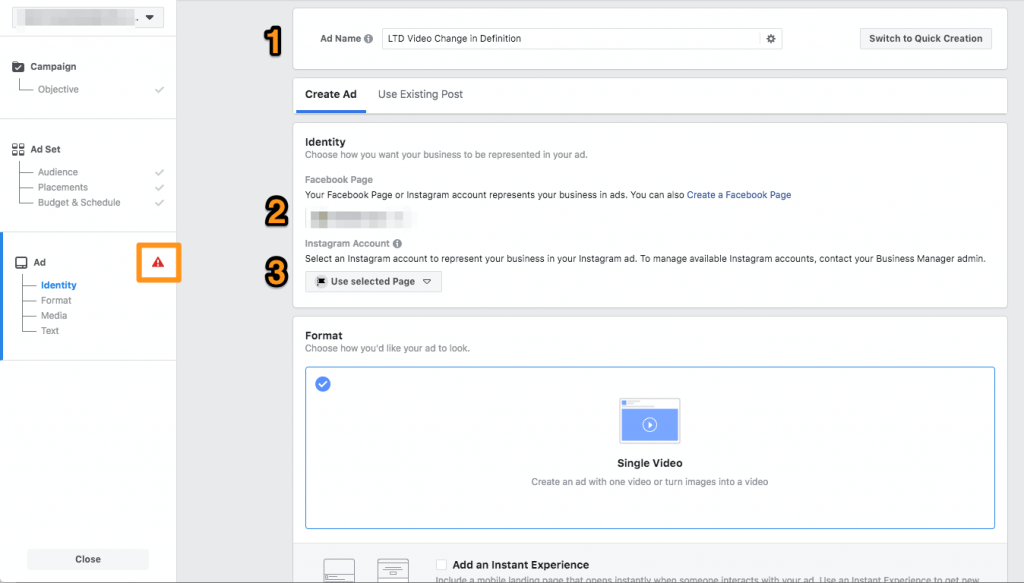
Next, in the Identity section, we’re going to hook up your Firm’s Facebook page. So that when your Ad runs on Facebook, people can see who posted the video. It should show up automatically, but double check in case you have access to multiple Facebook business pages. If you have an Instagram account, you can optionally select this (if it’s already connected to your Facebook Page’s account). Otherwise, leave it as Use selected page.
Upload your Video / Commercial
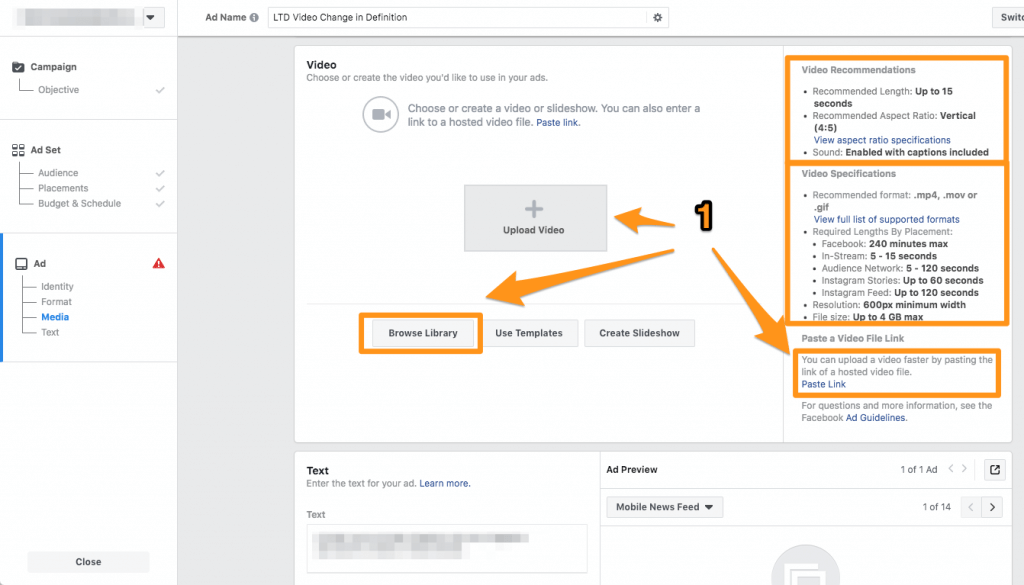
There are three options we will discuss for adding/uploading your firm’s commercial. Choose:
- Upload Video if you have the video file saved on your computer
- Browse Library if you have already uploaded it to your law firm’s Facebook business page
- Paste Link if you have a link to your video on YouTube or some other video hosting/sharing platform
Customizing your Copy
Once your video is added / uploaded, scroll down to the Text section.
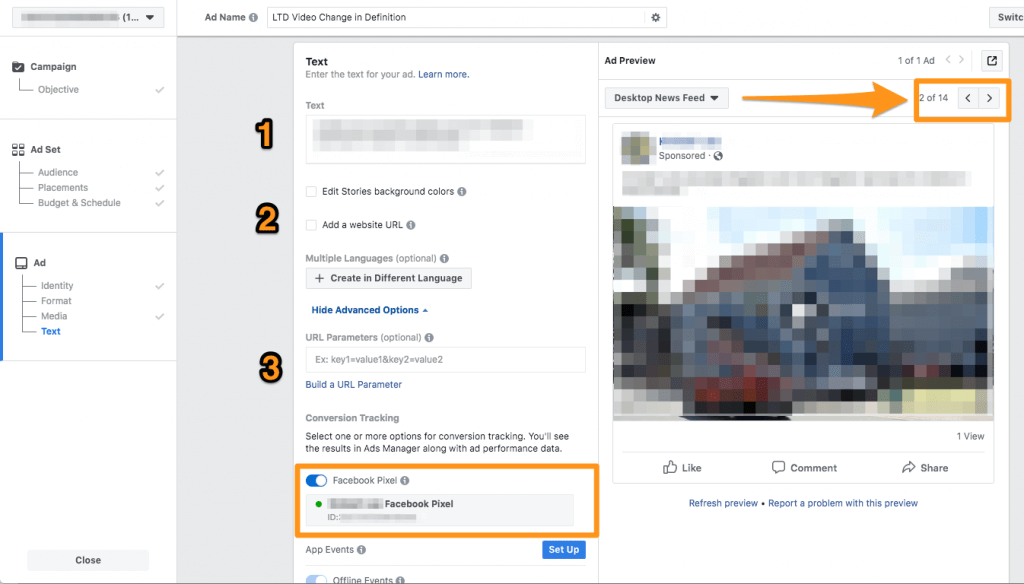
Bottom Left: If you have a Facebook Pixel installed on your website and in your account, you can toggle this on for target re-marketing ads later.
First, add the Text that you would like to be displayed in the ad. No matter which placement (e.g. Facebook’s News Feed, Stories, Instagram, etc.) this will be the copy that goes along with your ad. 1 – 3 sentences. You can write longer copy if you’d like, but we recommend writing a nice short hook for your video.
Next, click on Add a website URL and a box will appear where you can enter your law firm’s website. In the case that users click on your ad, they will be taken to the URL you enter. You can send users to any page on your website. Since this ad is for LTD and Disability claims, we could send our viewers to www.example.com/disabilty-claims/.
Track your Campaign
Optionally, if you have Google Analytics set up, you can click Build a URL Parameter and the dialog box shown below will appear. To enable advanced campaign tracking.

If you’re unfamiliar with campaign tracking, but want to set it up for your SEO or webmaster to measure your ad’s performance later, then just copy our settings. Campaign tracking is beyond the scope of this walkthrough. After entering the settings above, you should see a URL Preview on the bottom of the dialog window. If it begins with your firm’s URL, then this should work fine. If this is a little daunting for you, then just press Cancel. Otherwise, click Apply.
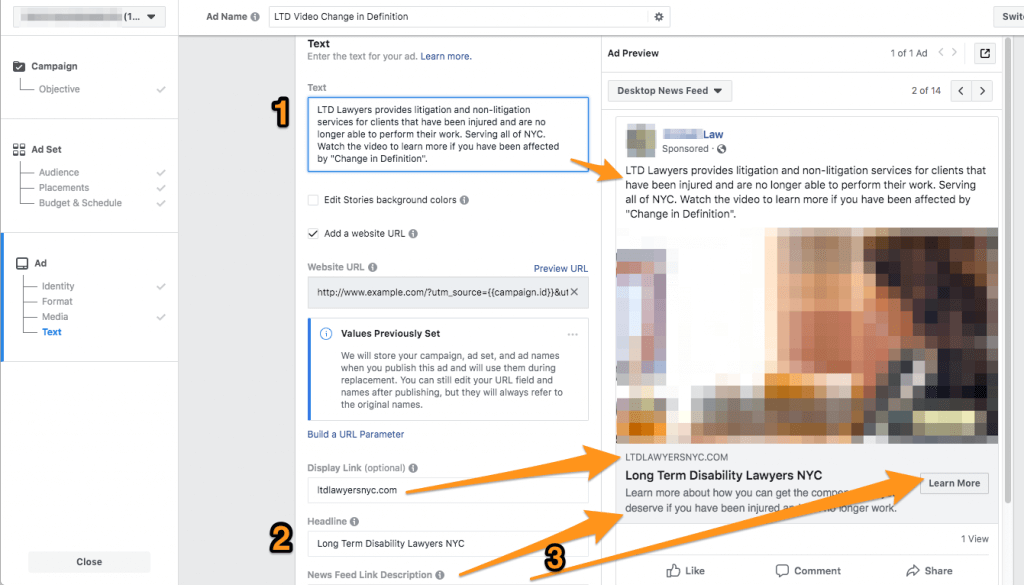

Once the Text and Website URL has been properly filled in, now fill in the Display Link Preview (optional), Headline, News Feed Description and Call to Action.
The Call to Action is a button that will take users that click on it to the website URL that you entered in the previous step. We recommend that for lawyers, to leave it as the default Learn More option.
That’s it! Finally! Scroll down to the bottom of the window and click Confirm. You will be taken back to the Ads Manager dashboard where your ad should appear as In Review.
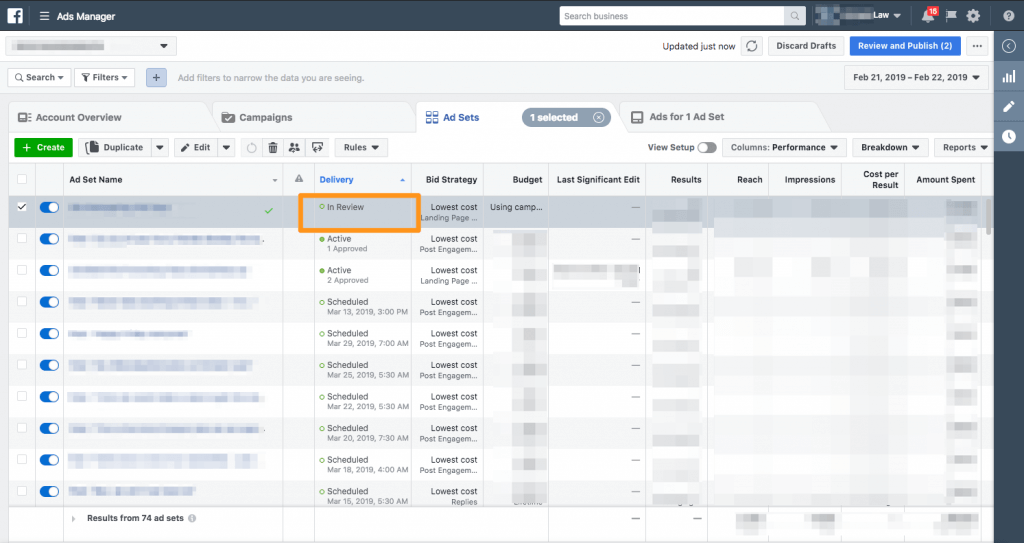
Once your ad has been Reviewed by Facebook, you will receive Facebook Notification and an email to the Facebook page’s administrator email address.
Why so Many Names and Why These Conventions?
Yes, there is a lot of naming in this. It’s a little confusing at first and while there are different conventions for how to name the three levels, I’ll explain how we decide to name these different components.
While we only created one video ad on Facebook (…with many steps) in this tutorial, it was a fairly basic campaign structure and the reason for all the complex names can be elusive. However, there is very good reasoning for it.
Within a Campaign, you can create multiple Ad Sets. For each Ad Set, you can create multiple Ads. Think of it like a Russian Doll, where each is nested in the next largest. Explaining this properly really deserves its own article, so we will jump into how to name each component.
Campaign Name vs Ad Set Name vs Ad Name
Campaign Name
The campaign name should describe your campaign’s marketing objective and the product/service it’s promoting. Since we selected Video Views and we’re promoting the LTD / Disability Legal services our firm handles, we decide to name it “Long Term Disability [Change in Definition] Video”.
Ad Set Name
The ad set name should include a descriptor of which campaign it belongs to and information about the audience, placements, and schedule. Since our campaign is for a Disability Ad and we’re running the ad in New York City, we named it LTD Video Ad [NYC].
Ad Name
The Ad name should describe the actual media (i.e. Video in the case of this ad). The ad has nothing to do with the campaign or the ad set. Instead, it’s all about the message in the ad and video itself. Since our ad is about LTD cases, we name it something to do with LTD cases. The ad could be running in NYC or we could change/edit the Ad Set to run in New Jersey. The Ad, however, wouldn’t change and therefore its name should only be used to describe the media and information we entered in Step 3.

